FITNESS EVALUATION

Why do People Exercise?
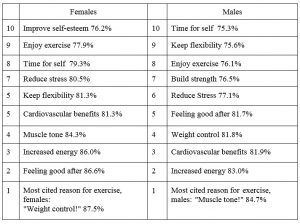
It’s important to establish the fitness service people wish to access when they come to your gym or fitness studio. There are many reasons why people go to a gym or begin an exercise program. Tracking people’s fitness movement report illustrates the following reasons why females and males go to gym.
Percent of participants of fitness activities age 18 and older who said the goal was “somewhat to very important”.
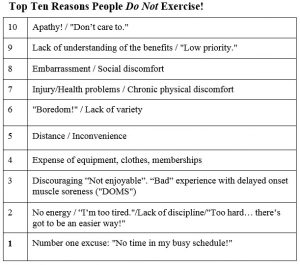
It’s also important to also identify why people cease exercising or do not exercise.
Each client is different and therefore we need to determine the above information and more through conducting a pre-exercise health screening and fitness evaluation (which will be discussed in further detail later) to determine why they are exercising and whether they are in a physical state to begin an exercise program.
PRE-EXERCISE SCREENING & FITNESS EVALUATION
Proper screening and risk stratification of clients who are starting exercise programs is important for promoting exercise safety and preventing adverse events during exercise. Personal fitness trainers (PFTs) must be able to utilize the proper tools and understand the information gathered from the exercise screening. Components of this screening include the health history questionnaire (HHQ); physical activity readiness questionnaire (PAR-Q); risk stratification; and informed consent.
Some of the most important items that should be identified with these screening tools are coronary artery disease (CAD). These risk factors can be associated with the overall promotion or development of CAD (seven positive risk factors!) or with the prevention of CAD (one negative risk factor!). Interestingly, risk factors can be summed to obtain a total number of factors, with a negative risk factor canceling out a positive risk factor if both are present. ACSM suggests that the list of risk factors not be considered all-inclusive, but rather be used as a guideline when determining if physician referral and further evaluation are needed before beginning a program.
Once the HHQ and PAR-Q are complete, individual clients can be evaluated based on their risk of experiencing an adverse cardiovascular event during exercise. According to the American College of Sports Medicine (ACSM), PFTs can stratify a client’s risk using variables such as age, risk factors, and symptoms suggestive of disease. The “Initial ACSM Risk Stratification” screening defines three risk categories:
Low Risk: younger individuals who are asymptomatic and meet no more than one risk factor threshold (from the CAD risk factor chart). It is not necessary for a medical / Doctor’s checkup for Light, moderate or vigorous exercise and no need to doctor supervision on exercise testing.
Moderate Risk: older individuals (men > 45 years of age; women > 55 years of age) or those who meet the threshold for two or more risk factors. It is not necessary for a medical / Doctor’s checkup for light exercise but is recommended prior to moderate and vigorous exercise and no need for doctor supervision on for submaximal testing but recommended for maximal exercise testing.
High Risk: individuals with known cardiovascular or pulmonary disease; known metabolic disease, such as type 1 or type 2 diabetes; or one or more signs/symptoms suggestive of any of these diseases. It is highly recommended that these clients have a doctor’s referral prior to commencing any form of exercise and fitness testing.
Once clients are identified according to risk, trainers should use common sense to determine whether their clients should be referred to a physician for a thorough medical exam prior to beginning either a moderate or vigorous exercise program.
Informed Consent
The last step in the exercise screening process should provide an opportunity for all clients to give informed consent before beginning an exercise program so both the trainer and the client are aware of their risk factors. The informed consent document can vary among facilities depending on clientele, staff, equipment, etc., but all informed consents should be written in an understandable manner and include certain basic information:
- purpose of the consent.
- degree of exercise supervision (i.e., close monitoring, occasional monitoring).
- benefits and risks of exercise participation.
- steps or procedures that will be followed in an emergency situation.
- responsibilities of the client (i.e., reporting of symptoms, exercise program adherence).
- statement covering confidentiality and freedom of consent to participate in the program.
True informed consent can be obtained only when the personal trainer verbally communicates the meaning of the form to the client (simply asking the client to read and sign it does not constitute informed consent). Provide an opportunity to answer client questions before the client and witness add their signatures. Since most legal claims against exercise professionals occur based on negligence or malpractice, having a signed informed consent on file can help prove that the client intentionally engaged in the exercise program after full disclosure and examination of risks associated with exercise participation.
What is a Fitness Evaluation?
Fitness tests, often referred to as fitness evaluations or fitness assessments, includes a series of written and physical assessments designed to provide information regarding a client’s current health / fitness status prior to them commencing an exercise program.
There are an endless number of possible tests and measurements that trainers and coaches may use to determine an individual’s baseline fitness level. These tests are often the starting point for designing an appropriate exercise program. The specific tests used in an assessment depend on the health and fitness goals of the individual, the trainer’s experience and the type of workout routines being performed. A combination of some or all of the following may be used.
What is the Purpose of the Assessment?
- Identify and refer at-risk clients.
- Obtain initial results for future comparison.
- Provide information for exercise prescription.
- Further establish rapport / communication with client.
Characteristics of an Assessment
Practicality
The assessment process and techniques should be easily administered and take into consideration the goals and needs of the client/s being assessed. For example, underwater weighing is considered the “gold standard” for assessing body composition. This method of assessment however, requires expensive equipment and considerable technical expertise and is therefore not practical outside of the laboratory setting.
Validity
An assessment method is considered valid if it actually measures what it claims to be measuring. For example, a 1RM bench press is a valid method of assessing upper body strength however it is not a valid method of assessing upper body muscular endurance.
Reliability
An assessment method is considered reliable if it can be repeated with minimal error. Factors that can affect reliability include experience of the instructor, the use of different instructors, client preparation, temperature, time of day and equipment calibration.
Cost effective.
Time efficient.
Components of an Assessment
- Pre-screening Questionnaire (PAR-Q).
- Health & Fitness Assessment.
- Physical Assessment.
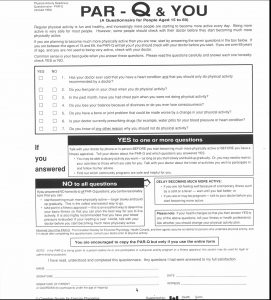
Physical Activity Readiness Questionnaire (PAR-Q)
- The PAR-Q has seven questions designed to provide initial screening for instructors.
- The PAR-Q is designed so that it can be self-administered by a client prior to attending a face to face consultation with an instructor.
- The questions in the PAR-Q are often incorporated into a more comprehensive screening process.
- Completion of a PAR-Q should be considered the minimum requirement for screening purposes.
Fitness Evaluation
The information gathered during the consultation should include the following:
- Personal details.
- Injury / illness history.
- Cardiovascular disease risk factor analysis (optional).
- Activity history.
- Exercise and personal goals.
- Cost.
- Time availability.
- Exercise plan or scheduling.
- Range of facilities and equipment available.
- Clients must also sign a statement of informed consent which includes the organizations / facilities privacy statement.
- Completion of a PAR-Q should be considered the minimum requirement for screening purposes.
When to Refer
- Client is taking any prescribed medication that may have an impact upon exercise.
- Client has current injuries or a known medical condition Medical conditions may include but are not limited to the following:
Cardiovascular
- Hypertension.
- Hypercholesterolemia.
- Previous Heart Attack.
- Angina.
- Claudication (peripheral artery disease that can cause limping).
- Heart Murmur.
Pulmonary
- Exercise Induced Asthma (EIA).
- Emphysema.
- Chronic Bronchitis.
Neurological
- Epilepsy.
- Stroke.
Metabolic
- Diabetes.
- Thyroid Disorders.
- Renal or Liver Disease.
Musculoskeletal
- Osteoporosis.
- Arthritis.
- Chronic Low Back Pain.
- Recent joint surgery.
- Currently receiving treatment from a qualified allied health care practitioner.
Client is pregnant or believes she may be pregnant
Client has two or more of the following cardiovascular disease risk factors (NHF)
- Family history of heart disease.
- Cigarette smoking.
- Hypertension.
- Hypercholesterolemia.
- Impaired fasting glucose.
- Obesity.
- Sedentary lifestyle / Physical inactivity.
- Age (ACSM Guidelines 2000).
- Males 45 years or older.
- Females 55 years or older.
Medical Clearances to Exercise
This process involves asking your doctor:
- Request for a clearance to begin exercising.
- Which activities you may safely participate in?
- What specific restriction, if any, should apply to your condition and which activities and /or exercises you should avoid or any activities that your doctor would particularly recommend to assist your particular condition?
- Identify when to exercise in relation to any medication currently being prescribed.
You might then get them to sign a further document that states that they have already cleared the condition/s in question with their doctor.
Basic Counselling
Active listening happens when you “listen for meaning”. The listener says very little but conveys much interest. The listener only speaks to find out if a statement (or two or twenty) has been correctly heard and understood.
Active listening happens when you “listen for meaning”. The listener says very little but conveys empathy, acceptance and genuineness. The listener only speaks to find out if a statement (or two or twenty) has been correctly heard and understood.
Active listening – It is so tempting to interrupt, so easy to be distracted.
So…
- Before the session, make sure your physical needs are taken care of (thirst, hunger, bathroom, stretching).
- Look at the Taking a few notes can keep you on task; mentally put masking tape across your mouth.
- Watch your body language! More on this later.
- Encourage the speaker to continue with short, gentle comments like “uh-huh”, “really!?”, “tell me more”,
If the person is not normally talkative, you may have to refer to your brief one or two word notes and ask an open question.
Body language takes into account our facial expressions, angle of our body, proximity of yourself to another, placement of arms and legs, and so much more. Notice how much can be expressed by raising and lowering your eyebrows!
Developing encouraging body language (BL) can take some practice. We all have our favorite stance, our “default position.” At the same time, communication is 55% body language, 38% tone and 7% words. So, remember that your client may not remember what was said, but they will remember how you made them feel.
I like the SOLERF method:
S – Squarely face person vs. sitting kitty-corner.
O – use Open posture vs. crossed arms and legs.
L – Lean a little toward the person vs. settling back in your chair.
E – use Eye contact vs. staring off into deep space.
R – Relax, keep it natural vs. sitting like a board.
F – look friendly vs. neutral or scowling.
Take a look at how you are sitting right now. Hmm … arms crossed? Slumped? Bored expression? Looking offside? Not good.
You need to monitor the tone of your voice – in the same way that you monitor your body language. Remember, the person may not remember what was said, but they will remember how you made them feel!
An open question is one that is used in order to gathering lots of information – you ask it with the intent of getting a long answer. A closed question is one used to gather specific information – it can normally be answered with either a single word or a short phrase. Good counseling techniques to know!
Asking questions – open and closed – is an important tool in the counseling kit. They can help a person open up or close them down.
An open question is one that is used in order to gathering lots of information – you ask it with the intent of getting a long answer.
A closed question is one used to gather specific information – it can normally be answered with either a single word or a short phrase. Good basic counsel skills to know!
Open-Ended Questions (OEQs) have no correct answer and require an explanation of sorts. The who-what-where-why-when-how questions your English teacher taught you to ask? Little did she know you’d be using them for asking questions in counseling!
Here are some good ones:
- What brought you in here today?
- Do you have an idea about why this keeps happening?
- What is your Plan B?
- How does that make you feel?
You’ll notice that I didn’t use “why?” directly. This is because some people find it threatening and overwhelming. It implies judgment and it can be asking an unanswerable question.
Open Ended Questions are great for:
- Starting the information gathering part of the session.
- Keeping the client talking
Closed Questions
These are questions that can easily be answered with a simply “yes or no” or very brief amount of information. Examples include:
- What is your name?
- Do you enjoy exercising?
- What is your occupation?
Sometimes they sound a little harsh, however they are required for:
- Obtaining necessary information.
- Bring a talkative client back on track.
- Act as an ice-breaker.
Paraphrasing is when you restate what the speaker said. Often different works are used and the listener may be using this to draw attention to a particular concern or aspect. Sometimes paraphrasing is used to clarify.
Summarizing is focusing on the main points of a presentation or conversation in order to highlight them. At the same time you are giving the “gist”, you are checking to see if you are accurate.
Note taking is the practice of writing down pieces of information, often in an shorthand and messy manner. The listener needs to be discreet and not disturb the flow of thought, speech or body language of the speaker.
PHYSICAL ASSESSMENTS
- Resting heart rate.
- Resting blood pressure.
- Anthropometric measurements (body composition).
- Cardio respiratory fitness.
- Flexibility.
- Strength.
Issues with Physical Assessment Procedures
Validity
Measuring what is being measured:
- Sit & reach- hamstring flexibility.
- Abdominal strength.
- Body composition measures.
- Cardiovascular assessment
- Experience level of staff
Reliability
- Producing the same results each time.
- Use of different staff.
- Calibration of equipment.
- Intrusive Nature of Assessment.
- Physiological effects: increased HR, BP.
- Psychological stress.
- Dehumanizing nature of assessment.
- Intimidating environment.
- Whether appropriate to assess every fitness component.
- Time factor involved in assessment.
Role of Fitness Instructor
- Comprehensive screening can be accomplished with written information.
- Get to know clients.
Efficient program design can be accomplished with verbal / written information Progress will be determined by the client
- Summary.
- Screen properly.
- Screen thoroughly.
- Refer accordingly.
- Assess sparingly.
- Assess accurately.
Resting Heart Rate
Heart rate can be taken at your radial (wrist) or carotid (neck) pulse. Place first two fingers lightly on the inside of wrist near the bone that protrudes below the thumb or between the windpipe and the neck muscles. Count for 15 seconds and multiply y four to obtain your heart rate per minute.
RHR should be taken in the morning, immediately upon awakening. This is because the body’s metabolism is at its lowest. Taking RHR only once may give an inaccurate indication. RHR may be elevated because the individual’s body is battling some form of virus.
A more accurate method may be to take RHR over 7 consecutive days. The highest and lowest values are then discarded. The five remaining values are then averaged as the resting heart rate.
BLOOD PRESSURE
Measure of the force or pressure exerted by the blood on the arteries.
Systolic BP
Highest pressure generated by the heart during contraction of the left ventricle indication of how hard the heart is working.
Diastolic BP
Relaxation / filling phase of the cardiac cycle, indication of peripheral resistance from arterioles into capillary beds.
Important means of establishing risk of CHD or exercise induced hypertension. If evident – medical clearance is vital before commencing exercise program:
Hypertension: chronic, persistent elevation of blood pressure if SBP > 160mmHg then 4 times risk of CHD if DBP > 95mmHg risks increases 6 times.
Classifications for Blood Pressure
Ideal blood pressure is considered to be 120 / 80 mmHg or below. However the follow table summarizes the National Heart Foundation values for client’s blood pressure readings that are ideal, acceptable and need to be referred to a medical practitioner.
Ideal
Systolic < or = 120mmHg
Diastolic < or = 80mmHg
Acceptable
Systolic 120 – 140 mmHg
Diastolic 80 – 90 mmHg
Need to refer
Systolic > 140 mmHg
Diastolic > 90 mmHg
Protocol for Taking Blood Pressure
- Instructor sits facing client with gauge in front.
- Client sits with their arm in a relaxed position, forearm supinated.
- Ensure that there is no restrictive It is best done with the client wearing a loose T-shirt.
- Wrap the deflated cuff around the upper arm of the The inferior edge of the cuff should be placed approximately 2.5 cm above the antecubital fossa (crease at elbow).
- Place the bell of the stethoscope approximately 1 cm inferiorly to the antecubital space over the brachial artery.
- The cuff is inflated to around 160-200 mmHg or 20 mmHg above the estimated systolic pressure.
- Slowly release the pressure at a rate of 2 to 3-mm sec noting when the first Korotkoff sound is This sharp thud is the result of a sudden rush of blood as the artery opens and corresponds to the systolic pressure.
- Continue reducing the pressure, noting when the sound becomes muffled (fourth-phase diastolic pressure) and then disappears (fifth-phase diastolic pressure). Usually the fifth-phase reading is a better measurement of diastolic pressure, yet harder to determine.
ANTHROPOMETRIC MEASUREMENTS
Weight
Scale weight is a simple measure of heaviness that does not differentiate between fat and fat- free mass. For that reason, it is not considered by many as a valid measure of body composition but acceptable for day to day measurement.
Body Mass Index (BMI)
BMI = Weight (kg)/Height (m)2
BMI is useful for measuring large populations as weight and height can be quickly and easily measured. As with the measurement of weight, BMI does not differentiate between fat and fat- free mass and is therefore biased against those with high body density.
Classification BMI
Underweight <18.5
Healthy Weight 18.5 – 24.9
Overweight 25 – 29.9
Obese 30 – 40
Morbidly Obese >40
Waist to Hip Ratio (WHR)
WHR is the ratio of abdominal subcutaneous and visceral fat to hip subcutaneous fat. This method is based on the assumption that measurement at the hips has less change than that at the waist. A problem arises however when hip measurements decrease similarly to the waist and no change is therefore recorded. Australian research data indicates that when the WHR exceeds 1.0 for males and 0.79 for females the risk of mortality from cardiovascular disease significantly increases.
Underwater Weighing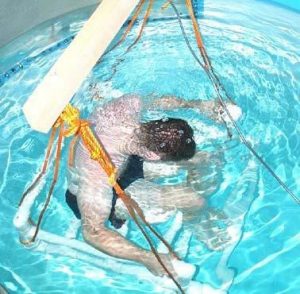
This technique is considered to be the gold standard of body composition measurement but unrealistic due to availability of the equipment. The client is weighed on land and underwater. Because fat and muscle have different densities, fat will float in water and muscle will sink. The difference between the client’s weight on land and underwater is used to determine body composition through a series of mathematical equations.
Bioelectrical Impedance Analysis
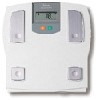 Bioelectrical impedance Analysis (BIA) involves passing a tiny electrical current throughout the body. Muscle tissue is a good conductor of electricity while fat tissue acts as an insulator and is therefore a poor conductor. The more FFM, the more current is conducted throughout the body. The results are significantly affected by the body’s water content. Therefore conditions to be the same from test to test. Generally, measurements from this method are less accurate than skinfold testing. BIA measurements consistently over-estimate percent body fat in lean individuals and under-estimate percent body fat in obese individuals.
Girth Measurements
Useful in determining the structural size of various body parts. Size can be measured for muscular or gains / losses which will be reflected by an increase / decrease in girth measurement Anthropometric Landmarks.
To identify where certain sites are located it is important to depict what certain anatomical terminology means.
Acromiale
The most posterior point at the superior and external border of the scapula. The instructor locates the acromion process by palpating laterally along the spine of the scapula. Mark the site by depressing the skin with your thumb and recheck the site.
Radiale
The midpoint at the top of the head of the radius. Use the left thumb to palpate downwards to the inferior portion of the lateral dimple of the client’s right elbow. This dimple is on the same side as the client’s right thumb while standing in the anatomical position.
Spinale
The site is located just below the tip of the anterior superior iliac spine of the right hip. Firmly grasp the right hip with your left hand and locate the landmark by palpating along the anterior superior spine with your right thumb. The site is located at the highest point of the spine.
Girth Measurement Protocols
- Hold the tape at right angles to the limb or body segment being measured.
- Apply enough tension so that the tape holds its position without causing indentation of the skin.
- Read tape at eye level.
- Record measurement to the nearest millimetre.
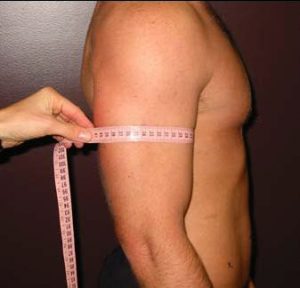
Arm girth
The perimeter distance of both arms parallel to the long axis of the humerus when the client is standing erect with both arms relaxed by their sides. Mid-point between the acromial and the radiale.
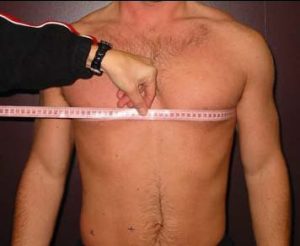
Chest girth
The client stands with their arms slightly abducted to permit the instructor to place the tape around the chest. The line of the tape should cross the height of the nipples and be parallel around their back. Females are encouraged to place the tape in the correct position themselves and the instructor then takes the measurement.
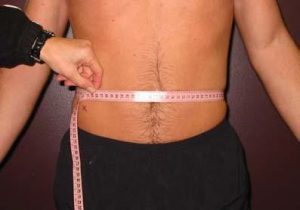
Waist girth (narrowest circumference):
Measurement at the perimeter level of the narrowest circumference of the client. The instructor stands front on to the client and the measurement will be taken on the anterior aspect of the body. This girth is mainly used just for females.
Waist girth (Omphalion circumference):
Measurement at the perimeter level of the omphalion (naval) the instructor will stand front on to the client and the measurement will be taken on the anterior side of the body directly over the clients naval.
Hip girth
Taken at the lateral aspect of the widest circumference of the client. The instructor will be side on to the client and the widest circumference will be determined by moving the tape superiorly and inferiorly. This girth will therefore take into account the client’s gluteal.

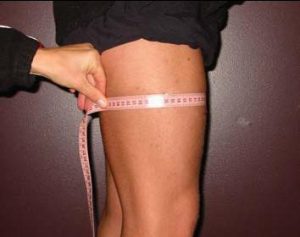
Thigh girth
The client stands erect with their weight event distributed on both feet. The measurement is taken halfway between the anterior superior iliac spine and the midpoint of the patella. This is to be measured using a tape measure and not “eye balling‟. The measuring tape is then placed around the thigh evenly, and the girth taken anteriorly to the client. In the event of the client wearing long pants, the measurement may be taken from the thumb line.
Calf girth
Taken on the anterior aspect of the tibia. The tape is placed evenly around the calf and moved superiorly and inferiorly until the widest circumference is recorded. If the client is wearing long pants, ask them to roll them up.

SKINFOLDS
Skinfolds allow the instructor to determine the body composition of a client by distinguishing between fat and lean body mass. This is done by measuring the thickness of various skinfolds on the body at selected sites. Formulas are often used to calculate the percentage of body fat of a client from the actual skinfold measurements however this method can over or under estimate of the client percentage of body fat due to two factors:
- Instructor error.
- Assumptions from formulae used in the calculations and the reference tables used (different population groups).
A more preferable way of monitoring body composition is to simply calculate the sum of the skinfolds in millimeters (mm).
If the client is suspected of having a large skinfold sum it is preferable not to take any skinfold measurements at all and utilize other measures of change in their body composition ie. Type and fit of clothing, girth measurements.
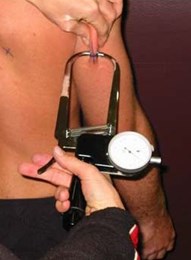
Protocol for Taking Skinfolds
– A skinfold includes a double layer of skin and the underlying adipose tissue but not the muscle.
– All skinfolds are obtained by pinching, slightly rolling action of the left thumb and index finger.
– Raise the skinfold exactly at the marked site with firm pressure and hold it throughout the measurement.
– Apply the caliper at right angles to the skinfold and so that the near edge of the pressure plate is 1 cm laterally from the controlling thumb and index finger.
– Read the caliper dial after releasing the full spring pressure of the This is achieved by a complete release of the caliper trigger.
– Take the reading exactly two seconds after the application of the full jaw pressure, regardless of whether or not the needle is A useful procedure is to count the time after releasing the caliper trigger: „one thousand and one, one thousand and two‟.
– If the skinfold is difficult to raise, the caliper can be forced to the muscle level and then slightly withdrawn, provided that the fold is controlled by the grasp of the fingers.
– Obtain two measurements at each site in sequence, not repeatedly at the one site. Record all measurements to the nearest millimetre. If both scores are not within 10% of each other obtain a third reading.
Skinfold Sites
All sites should be taken on the client’s right side. The six sites are measured in the following order:
- Triceps
- Biceps
- Subscapular
- Supraspinale
- Mid-abdominal
- Medial calf
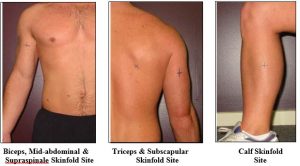
Triceps skinfold site
The site is measured on the posterior aspect of the upper right arm. Raise the skinfold parallel to the long axis of the arm and grasp exactly at the midpoint of the acromiale- radiale site. This is half way between the acromiale and radiale as determined by use of a tape measure.
Biceps skinfold site
Measured on the anterior aspect of the right arm. The skinfold is raised parallel to the long axis of the upper arm and grasped exactly at the midpoint of the acromiale-radiale site (exactly opposite the triceps site).
Subscapular skinfold site
The site is located 2 cm along a line running laterally and obliquely from the subscapular landmark at an angle of approximately 45o. If there is difficulty in locating this site, ask the client place their arm behind their back to make the scapula more predominant.
Mid-abdominal site
Located 5 cm laterally to the midpoint of the omphalion (navel). A vertical skinfold is raised at this site.
Supraspinale skinfold site
This site is positioned 7 cm superiorly to the spinale (as described) on a line from the spinale to the axilla. The skinfold runs naturally downwards on a 45o angle from the horizontal.
Medial calf skinfold site
The skinfold is taken vertically on the medial side of the right calf at its greatest circumference. The greatest circumference is determined by measurement using a tape measure. Once this has been determined, the client is seated with their knee positioned at a right angle, and the skinfold taken on the medial calf.
Optional Skinfold Sites
The two following skinfold sites are used to calculate the Sum of 7 (∑ 7) (thigh) and Sum of 8(∑ 8) (thigh and mid-axilia). These skin fold sites were originally developed by the Australian Institute of Sport and so often are utilised by sporting teams, with the sum of 7 being used for females and sum of 8 for males.


Mid-thigh skinfold site
This site is taken 1 cm distally to a raised fold on the anterior surface of the thigh along the long axis of the femur. Subject is seated with knee flexed to 90o and the mid-thigh position is measured as the midpoint between the inguinal crease and the patella. If difficult to raise the subject is asked to cup their hands under the thigh reducing skin tautness.
Mid-axilla skinfold site
The mid-axilla skinfold site is a vertical fold on the mid-axillary line at the level of the xiphoid process of the sternum. The subject lifts the right arm at 90o to the body and places the right hand on the head.
FLEXIBILITY
Flexibility testing measures the ability to move a joint through a full range of motion. The sit- and- reach is the most common method used to assess low back and hip flexibility. This test has numerous limitations. Although it is said to measure lower back and hamstring flexibility, this tests fails to differentiate between lower back flexibility; hamstring length; neural tension; arm, trunk, and limb length; and calf flexibility. Despite its obvious limitations the sit-and- reach is still commonly used, probably because the availability of normal data. Allow for adequate warm up prior to testing.
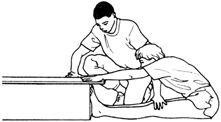
Procedure for Sit-and-Reach test
- Client sits on the floor with bare feet vertically placed on box with legs fully extended.
- One hand is place over the top of the other, palms face down, fingers out stretched and elbows straight.
- Client leans as far forward as possible moving hands along ruler of sit-and-reach Stretch should be held for 2 seconds.
- The best of the three trials is recorded.
Comparative Range of Motion Assessment
Perhaps a more comprehensive method of assessing flexibility is a comparative range of motion (ROM) assessment. This will be discussed in more detail when you go onto study Posture later on. However to briefly introduce this concept let’s have a look at a few assessments.
Definition: Range of motion (ROM) is a term commonly used to refer to the movement of a joint from full flexion to full extension. Exercise physiologist and physical therapists measure range of motion in a joint with an instrument called a goniometer that measures joint range of motion in degrees from the starting position.
Too much ROM in a joint can be just as harmful as too little ROM, and result in joint instability, dislocations and deterioration. Physical limits to range of motion are determined by our skeleton, joint type, ligaments, tendons, muscles, etc.
Other things that affect ROM include disease, injuries and adaptations to repeated movements. This last one is often overlooked by athletes as one of the biggest factors in our “limited ROM.” We adapt to what we do. If we consistently play one sport, or perform the same (limited) movement patterns over years, we will adapt to those patterns.
With comparative ROM assessments we are comparing the Left and Right sides and determining the degree of difference. We are attempting to identify any significant differences or obstructions in joint motion.
What Is Normal Range of Motion Of a Joint?
Although there is variability among individuals, the following are generally accepted values for normal range of motion (ROM) in major (not all joints and not all movements) joint as measured in degrees (°). Common joint movements include flexion, extension, abduction, and adduction.
Hip
- flexion 0° to 125°
- extension 115° to 0°
- abduction 0° to 45°
- adduction 45° to 0°
- lateral rotation (rotation away from center of body) 0° to 45°
- medial rotation (rotation towards center of body) 0° to 45°
Knee
- flexion 0° to 130°
- extension 120° to 0°
Ankle
- plantar flexion (movement downward) 0° to 50°
- dorsiflexion (movement upward) 0° to 20°
Foot
- inversion (turned inward) 0° to 35°
- eversion (turned outward) 0° to 25°
Shoulder
- flexion 0° to 180°
- extension 0° to 50°
- abduction 0° to 90°
- adduction 90° to 0°
Elbow
- flexion 0° to 160°
- extension 160° to 0°
- pronation (rotation inward) 0° to 90°
- supination (rotation outward) 0° to 90°
Example: Shoulder Flexion Test
These movements can be performed in either the standing or seated position. Get the client to attempt to raise their arm to a shoulder flexion fashion to in line with their head. Record the amount of degrees they get to i.e. in line with the head (ear) is 180 degrees, shoulder height is 90 degrees.

Ankle Dorsiflexion Test Testing Protocol:
 NO SHOES.
- Foot on marked tape with toe/s touching the wall.
- Bend knee until contact is made with the wall.
- Ensure heel remains on the ground at all times.
- Continue to move foot further away from wall and repeat the procedure until a distance is reached where heel no longer maintains contact.
- Your score is the last number you completed successfully.
No real average score here, (a good score is 10+, <5 is not good), you are mainly looking at a difference between L & R.
Hence with a comparative range of motion assessment at a fitness instructing level, choose a few test such as the shoulder, ankle (dorsiflexion test) and even the hip (flexion & extension) to administer. What these tests will assist in informing you is whether there is a significant muscle imbalance present that may require further professional assistance such as a Physio or Exercise Physiologist.
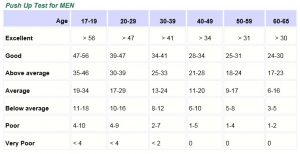
Strength Test
There are many types of strength test that you can use here are two tests that you can do but not limited to.
Push Up Test – You can easily test your upper body strength by using this simple test. How many push-ups can you do? Men should use the standard “military style” push-up position with only the hands and the toes touching the floor in the starting position. Women have the additional option of using the “bent knee” position. To do this, kneel on the floor, hands on either side of the chest and keep your back straight. Lower the chest down towards the floor, always to the same level each time, either till your elbows are at right angles or your chest touches the ground. Do as many push-ups as possible until fatigue. Count the total number of push-ups performed. Use the chart below to find out how you rate as a guide only.

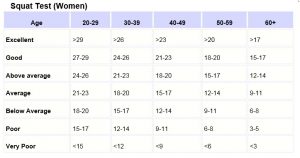
Squat Test
Stand in front of a chair or bench with your feet at shoulder’s width apart, facing away from it. Place your hands on your hips. Squat down and lightly touch the chair before standing back up. A good sized chair is one that makes your knees at right angles when you are sitting. Keep doing this until you’re fatigued.
Write down how many squats you can do. After you work out for a while, take the test again to see how much your lower body strength has improved.
Compare your results to the table below. Remember, these scores are based on doing the tests as described, and will lose accuracy if the test is modified, including using a higher or lower chair. In reality, you shouldn’t worry too much about how you rate – just try and improve your own score.

AEROBIC CAPACITY
Assessment of Aerobic Capacity.
Cardio respiratory endurance is the ability of the heart and lungs to perform repeated work for extended periods of time. There are two forms of assessments for this fitness component, direct and indirect.
The direct measurement of maximal oxygen uptake (VO2max) is the most accurate method of assessing CV fitness. This involves high-tech equipment and experienced instructors and directly measures the amount and concentration of oxygen and carbon dioxide being breathed in and out to calculate VO2 max. In addition clients are literally taken to their maximum in regards the workloads used.
Indirect measurement involves using submaximal workloads to predict VO2 and is most commonly used in the fitness center environment. There are a number of different protocols that can be used to assess CV fitness. All of these have a number of common concepts which will be explained below.
Linear Relationship b/w HR, WL and O2 Consumption
As exercise intensity increases heart rate will increase due to the increased demand for oxygen from the working muscles. In sub maximal assessments, this relationship is assumed to be linear i.e. occurs in a straight line. Most protocols will require the client to exercise at a number of increasing workloads while the heart rate is monitored.
Since it is assumed that the heart rate will increase in a straight line as the workload increases, it is then assumed that oxygen consumption also increases in a straight line. This information then can be plotted on a graph to calculate oxygen consumption at any point along this line.
Steady State HR
The second concept is that to ensure an accurate reading of where the straight line is heading, the client’s heart rate needs to stabilize. This generally occurs after 3 minutes at the same workload.
Age predicted max HR
Since the sub maximal assessment protocols do not take the client to voluntary exhaustion, it is important to calculate the age predicted Maximum Heart Rate (HR max) to allow prediction of the oxygen consumption at the maximum heart rate. The generally accepted formula is HR max = 220 – Age. The line on the graph is then taken up to this point and the predicted VO2max can be calculated.
Prediction of VO2 max
As we know aerobic capacity is the highest amount of oxygen consumed during maximal exercise in activities that use the large muscle groups in the legs or arms and legs combined. There are a number of ways to test one’s aerobic capacity.
Field tests are one method that is safe, easily administered, and require little equipment. Using standardized administration, these field tests provide valid and reliable estimates of aerobic capacity.
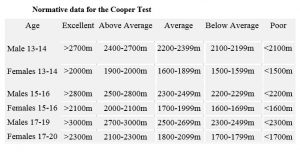
Coopers Test
Resources Required.
To undertake this test you will require:
- 400 meter track – marked every 100 meters.
- Stop watch.
Test Procedure:
- The athlete / client conducts a 10 to 15 minute warm up.
- Using the track the athlete runs/walks as far as possible in 12 minutes.
- The trainer records the total distance covered to the nearest 100 meters.
- The athlete / client conducts a cool down.
Analysis
Analysis of the result is by comparing it with the results of previous tests. It is expected that, with appropriate training between each test around 6-8 weeks, the analysis would indicate an improvement. You can also compare.
VO2 max Calculation
Top of Form
An estimate of your VO2 max can be calculated with the following formula:
- (Distance covered in meters – 9) ÷ 44.73

1- Mile Walk Test (Rockport Test)
This is a walking test (also referred to as the Rockport Fitness Test) of aerobic fitness which is great for clients (above the age of 13) who can’t run or train/test at maximal intensity. See also the description of the other alternative the 1-mile run test below.
Resources Required:
- stopwatch.
- marked 1 mile track ( 6km) or path on level ground with firm and smooth surface (e.g. athletics track, football oval).
- heart rate monitor (optional).
Test Procedure:
- The aim of this test is to complete a 1 mile course in the shortest possible time.
- Client should maintain a constant walking pace the entire distance.
- Client starts on the word “Go” & this is when the stopwatch starts.
- At the conclusion of the walk, each person should measure a 15-second heart rate count, or heart rate can be measured using a heart rate monitor.
- Take note of the time taken to complete 1 mile.
VO2 max Calculation
A VO2max score can be calculated using the following equation:
Females: VO2 = 139.168 – (0.388 x age) – (0.077 x weight in lb.) – (3.265 x walk time in minutes) – (0.156 x heart rate).
Males: add 6.318 to the equation for females above.
Further Comment:
- Large groups of athletes can be tested at once, and it is a very cheap and simple test to perform.
- If the test is conducted on a 400m running track, all the athletes will be in view throughout the test, and split times can be given at each lap to help with pacing strategies.
- this test can be self-administered if needed.
- Practice and pacing is required to ensure a representative score, and performance on this test can be affected greatly by motivation.
1- Mile Run Test
This is a running test (similar to the walk test although of a higher intensity) of aerobic fitness which is great for clients (above the age of 13) who can’t run or train/test at maximal intensity.
Resources Required:
- stopwatch.
- marked 1 mile track ( 6km) or path on level ground with firm and smooth surface (e.g. athletics track, football oval).
- heart rate monitor (optional).
Test Procedure:
- The aim of this test is to complete a 1 mile course in the shortest possible time.
- Client should maintain a constant walking pace the entire distance.
- Client starts on the word „Go‟ & this is when the stopwatch starts.
- At the conclusion of the walk, each person should measure a 15-second heart rate count, or heart rate can be measured using a heart rate monitor.
- Take note of the time taken to complete 1 mile.
VO2 max Calculation
A VO2max score can be calculated using the following equation:
Females: VO2 = 139.168 – (0.388 x age) – (0.077 x weight in lb.) – (3.265 x walk time in minutes) – (0.156 x heart rate).
Males: add 6.318 to the equation for females above.
Further Comment:
- Large groups of athletes can be tested at once, and it is a very cheap and simple test to perform.
- If the test is conducted on a 400m running track, all the athletes will be in view throughout the test, and split times can be given at each lap to help with pacing strategies.
- this test can be self-administered if needed.
- Practice and pacing is required to ensure a representative score, and performance on this test can be affected greatly by motivation.
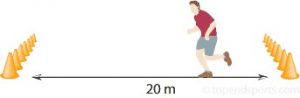
The 20m multistage fitness/Beep Test
The 20m multistage fitness test (also known as the 20 meter shuttle run test, beep or bleep test) is a commonly used maximal running aerobic fitness test. It is not suitable for Older Adults or unfit/untrained clients. This test is also suitable for sports teams and school groups.
Resources Required:
- Flat, non-slip surface (indoor basketball, netball or volleyball court).
- Grass surface is suitable if it’s not wet.
- Marking cones.
- 20m measuring tape.
- Beep test can be tape or Preferably a CD because tapes stretch over time & the tapes need to be calibrated which involves timing a one-minute interval and making adjustment to the distance between markers.
Test Procedure:
- This test involves continuous running between two lines 20m apart in time to recorded beeps.
- The test subjects stand behind one of the lines facing the second line, and begin running when instructed by the cd or tape.
- The speed at the start is quite slow.
- The subject continues running between the two lines, turning when signaled by the recorded After about one minute, a sound indicates an increase in speed, and the beeps will be closer together. This continues each minute (level).
- If the line is not reached in time for each beep, the subject must run to the line turn and try to catch up with the pace within 2 more beeps‟.
- If the line is reached before the beep sounds, the subject must wait until the beep The test is stopped if the subject fails to reach the line (within 2 meters) for two consecutive ends.
VO2 max Calculation
The athlete’s score is the level and number of shuttles (20m) reached before they were unable to keep up with the recording. Record the last level completed (not necessarily the level stopped at).
- A normative table below:
Normative data for VO2max
Female (values in ml/kg/min)


Validity: The correlation to actual VO2 MAX scores is high.
Additional Comments:
Although the beep test is primarily a fitness test of the aerobic energy system, there are a range of other factors that can affect performance in the test and are important to consider. These include:
- running efficiency and turning technique.
- anaerobic capacity.
- environmental differences.
- clothing and running surfaces.
- test familiarization and instructions.
Queens College Step
The Queens College Step test is one of many variations of step test procedures, used to determine aerobic fitness.
- Equipment: 25 inches / 41.3 cm step, stopwatch, metronome or cadence tape, heart rate monitor (optional).
- Procedure: The athlete steps up and down on the platform at a rate of 22 steps per minute for females and at 24 steps per minute for The subjects are to step using a four-step cadence, ‘up-up-down-down’ for 3 minutes. The athlete stops immediately on completion of the test, and the heart beats are counted for 15 seconds from 5-20 seconds of recovery. Multiply this 15 second reading by 4 will give the beats per minute (bpm) value to be used in the calculation below.
- Scoring: an estimation of VO2max can be calculated from the test results, using this A rating can be determined using the VO2max norms.
Men: VO2max (ml/kg/min) = 111.33 – 0.42 x heart rate (bpm).
Women: VO2max (ml/kg/min) = 65.81 – 0.1847 x heart rate (bpm).
- Advantages: minimal equipment and costs involved, little time required, and can be self-administered.
- Disadvantages: Biomechanical characteristics vary between individuals (e.g. taller people are at an advantage).
Nine Minute Sub-Max Cycling Test
Step 1 – Set client up with heart rate monitor and check to see it is operating correctly.
Step 2 – Adjust seat height so that client has a slight knee bend at the bottom of the pedal range.
Step 3 – Describe the purpose of the test. I.e. The test is a submaximal prediction of VO2 max. This will show us how efficiently your cardio respiratory/ vascular system can provide oxygen to the working muscles.
Step 4 – Through using the Monark ergometer settings sheet, choose the appropriate beginning work rate based upon gender.
Step 5 – Instruct the client to begin pedaling at 50 rpm. Explain to them that it is quite an easy rate so that they don’t begin pedaling too quickly.
Step 6 – Have the client pedal for 3 minutes or until a steady state has clearly been reached.
Step 7 – Based upon working heart rate at steady state, select 2nd workload. And repeat as above.
Step 8 – Based upon working heart rate at steady state, select 3rd workload. And repeat as above.
Step 9 – Plot heart responses vs workload on graph sheet.
Step 10 – Place a line across the top of the page at the max heart rate. (220 – age).
Step 11 – Run a line of best fit through the three test heart rates until it reaches the max heart rate line.
Step 12 – From the point where the lines meet run another line vertically down the page.
Step 13 – The point that this reaches will be your predicted VO2 max score.
Step 14 – To work this figure out based upon weight. VO2 MAX (L/Min) x 1000/ weight = ml/kg/min
Note– Make sure PARQ has correctly been filled out prior to beginning the test to check for possible risk factors. If the client feels dizzy during the test, cease the test immediately.


FITNESS SCREENING AND FITNESS ASSESSMENT REPORT EXAMPLE
Post the screening process you should write a brief report on your findings, things that you will use to assist you in designing a client’s program. Below is an example, you can design your own if you wish. Make is clear and concise. For example:
Blood pressure:
BP is within the normal range so not changes to nutrition or exerciser needs to be made.
General fitness (VO2 Test):
General fitness from the 1.6km walk indicates a very low level of fitness, hence we need to start the program off on a low intensity.
Body Composition:
23% bodyfat which is slightly high. Needs to lose weight around mid-section.
Strength:
Limited strength due to strength training experience
Flexibility:
Limited hamstring flexibility so need to work on that at least every training session.
Fitness activities that you would recommend as suitable for this client:
Walking and light strength training. HATES swimming so no pool work.
Frequency:
3 times per week to begin.
Intensity suggested:
Low intensity, 60% of maximum heart rate.
Motivation strategies appropriate for this client (list & describe 3):
- Doesn’t enjoy exercising by oneself so recommend to find a friend to train with.
- Hates early mornings training so schedule training sessions mid-morning otherwise she won’t do them if they are in the afternoon.
- Keep a training diary and food diary for the next 2 weeks to stay on track.
Other relevant comments:
Be very wary of intensity at the start, has had a gym program before and quit because it was too hard.